
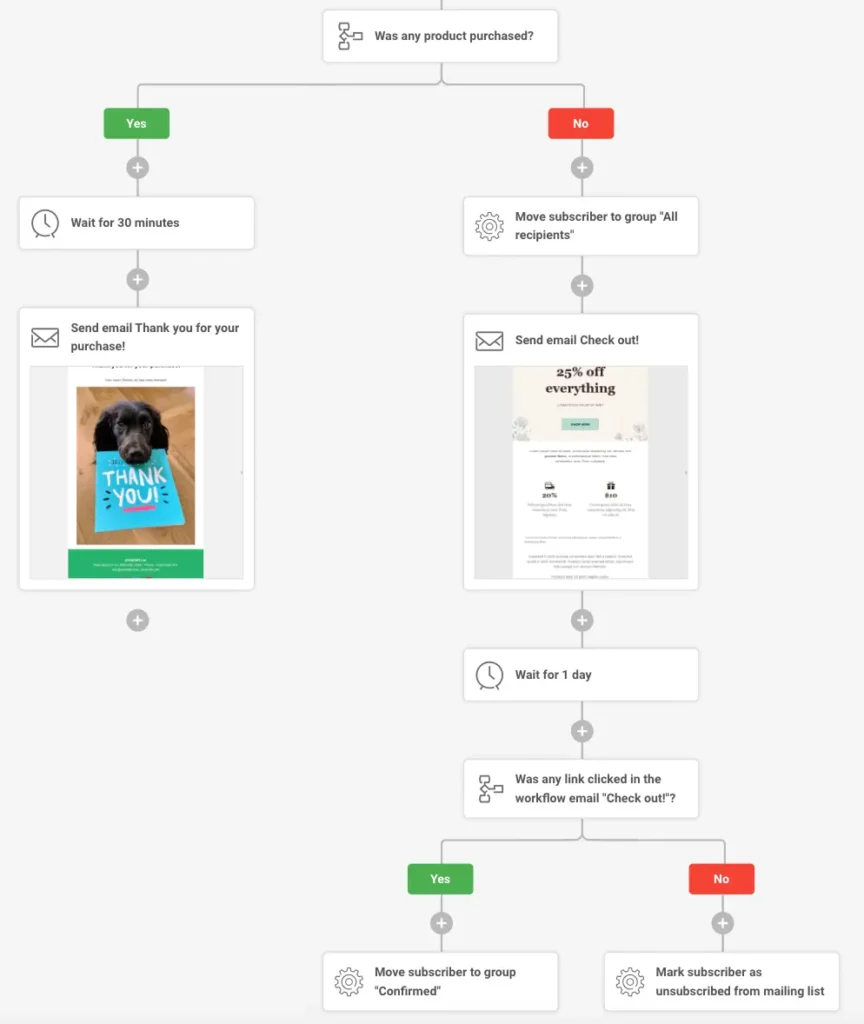
Email workflow automation is what lets a small business send the right email at the right moment without anyone pressing send. Someone joins your list, and a welcome sequence goes out. A customer abandons their cart, and a reminder follows an hour later. You build the logic once, and it runs on its own.
This guide explains what an email workflow automation actually is, then walks you through building your first one step by step inside Sender, a tool whose free plan includes automation (most don’t). By the end you’ll have a working sequence that nurtures and converts leads on autopilot.
What is email workflow automation?
An email workflow automation is a sequence of steps that runs automatically when a subscriber does something. Instead of scheduling every message by hand, you set the rules once and the system reacts.
Every workflow is built from four kinds of building blocks:
- Trigger: the event that starts the workflow. Someone joins a group, clicks a link, has a birthday, or abandons a cart.
- Delay: a wait between steps, so emails don’t all land at once.
- Condition: a fork in the road. Did they open the last email? Did they buy? The workflow branches based on the answer.
- Action: what happens: send an email, add a tag, move them to another group.
Chain these together and you get a sequence that feels personal but takes zero manual effort once it’s live.
Why email workflow automation matters for a small business
If you’re running everything alone, your time is the bottleneck. Automation removes the repeat work so a single setup keeps earning long after you’ve moved on to something else.
Done well, an automated workflow does three things a manual campaign can’t:
- It reacts instantly. A welcome email that arrives the second someone signs up converts better than one you send in a weekly batch.
- It nurtures leads over time. Most people don’t buy on day one. A short sequence builds trust across several days and turns a cold subscriber into a customer, the whole point of email marketing automation for nurturing and converting leads.
- It scales without more hours. Whether ten people or ten thousand join your list this month, the workflow treats each one the same, at the right moment.
This applies to both directions of email: a welcome flow that warms up inbound signups and outbound email automation that follows up with prospects you’ve reached out to.
The tool we’ll use: Sender
Most email tools lock automation behind a paid plan. Sender doesn’t; its free plan includes automation, segmentation, and analytics for up to 2,500 subscribers and 15,000 emails a month. For a small business building its first workflow, that’s enough to run a real sequence without paying anything (your emails carry Sender branding until you upgrade, starting around $7/month).
That’s why we’re using it for this walkthrough. If you want the wider comparison of email tools first, see our guide to building an email marketing funnel for your small business.
How to build your first email workflow in 7 steps
Here’s the exact process inside Sender. The same logic applies to most tools, but the menu names below match Sender’s builder.
Step 1: Open the automation builder
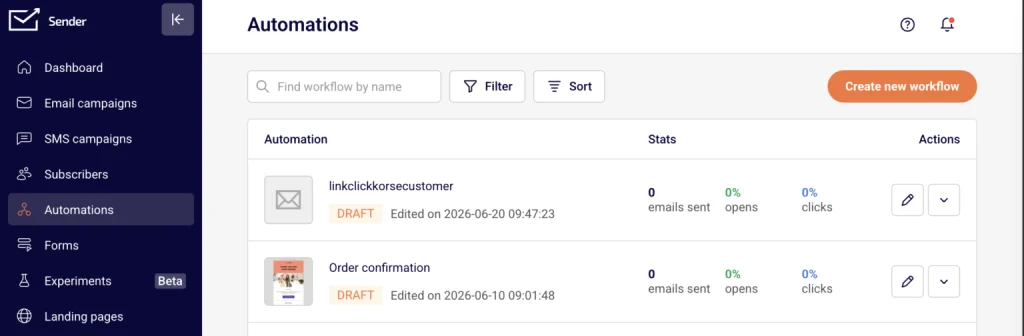
In your Sender dashboard, click Automations in the left sidebar, then Create new workflow in the top right. A window appears with two paths: start from a ready-made template (Welcome, Onboarding, Win-back, Order confirmation) or Create from scratch. For your first build, a template teaches you the structure fast; from scratch gives you full control.
Step 2: Set your trigger
The trigger is the event that starts everything. Sender offers triggers like a subscriber joins a group, a date or anniversary, a link click, and abandoned cart. For a first welcome workflow, choose “subscriber joins a group” and select the group your opt-in form feeds into. Configure the details in the panel on the right, then save.
Step 3: Add your first email
Add an Email step and open the editor to write it. This is your welcome email deliver whatever you promised at signup and set expectations for what’s coming. One note: the email step stays marked incomplete until you’ve actually created and saved the content, so don’t skip the editor.
Step 4: Add a delay before the next email
Add a Delay step after your first email. Don’t send messages back-to-back; space them out by at least one to three days so you land in the inbox as a helpful sender, not a flood. This single habit protects your open rates more than any clever subject line.
Step 5: Add a condition to branch by behavior
This is where a workflow gets smart. Add a Condition step to split subscribers based on what they did: opened the last email, clicked a link, made a purchase. People who clicked can go straight to your offer; people who didn’t can get a gentler nudge first. Branching is what turns a basic drip into real email marketing automation that nurtures and converts leads.
Step 6: Complete the sequence
Add the remaining emails with a delay between each. A beginner sequence rarely needs more than four or five: welcome, a useful tip, social proof, and one clear offer, plus an optional follow-up. Resist the urge to add ten emails a short, useful sequence beats a long, ignored one.
Step 7: Test, activate, and monitor
Before going live, run a test subscriber through the whole flow to check the timing and links. Then activate the workflow. From the Automations list you can watch the numbers that matter emails sent, opens, and clicks and adjust the weak step instead of rebuilding the whole thing. You can also edit an active workflow; changes apply to new subscribers entering it.
Email workflow automation best practices
A few habits separate a workflow that converts from one that annoys people:
- Always add a delay between emails. One to three days is a safe default. Back-to-back sends look robotic and hurt deliverability.
- Start with one goal. A workflow that tries to do three things does none of them well. One trigger, one outcome.
- Keep it short, then extend. Launch with four or five emails and add more only if the data says the sequence is working.
- Watch opens and clicks per step. If email two gets opened but nothing gets clicked, the problem is the call to action, not the whole flow.
- Pause instead of deleting. If something’s off, hit Deactivate subscribers already in the workflow finish their sequence, and you avoid a half-broken send.
Common email workflows to build first
Not sure what to automate? These three cover most small businesses and map directly to Sender’s triggers:
- Welcome series. Triggered when someone joins your list. Delivers the lead magnet, builds trust, and makes one soft offer over four or five emails.
- Abandoned cart. Triggered when a shopper leaves items behind. A reminder an hour later with the product image recovers sales you’d otherwise lose. This is the highest-ROI workflow for any store.
- Re-engagement (win-back). Triggered when a subscriber goes quiet for a set period. A short “still interested?” sequence brings some back and lets you clean out the rest.
Start with the welcome series. It’s the simplest to build and the one every subscriber will see.
➡️ Start building free with Sender automation included, up to 2,500 subscribers.
The bottom line
Email workflow automation isn’t complicated. It’s a trigger, a few emails, and delays between them set up once, running on its own. Start with a single welcome workflow, keep it to four or five emails, space them out, and watch your opens and clicks before adding anything fancier.
Sender makes this approachable because you can build a complete, automated workflow on its free plan and only pay once your list outgrows it. Set up your first sequence this week, and let it do the follow-up you’d otherwise never find time for.
FAQ

Fedora writes step-by-step guides for non-technical founders, turning complex SaaS setups into clear, follow-along tutorials. She focuses on getting small business owners from sign-up to first results without the jargon.